Receive all updates via Facebook. Just Click the Like Button Below

Powered By | Blog Gadgets Via Blogger Widgets

HomeAboutContact

Tuesday, December 10, 2013

It's Beginning to Look a Lot Like Christmas


           Today we have a second snow day! :(  Normally,  I'm like any other teacher and love snow days but I had so many fun things planned for this week.  Oh well... hopefully we'll get back tomorrow for more Gingerbread Fun!
         We are reading LOTS of versions of the Gingerbread Man. We've also been talking about characters, setting and plot and have been doing lots of comparing and contrasting.  We will be graphing our favorite version later this week. In addition, we've done the following:

Gingerbread Playdough


We are making gingerbread cookies with our delicious smelling gingerbread play dough.  The recipe is from Sweet Sugar Belle and the color comes from all the delicious spices in the recipe.  

A Gingerbread Exchange

We participated in Growing in Pre-K's Gingerbread exchange.  Thanks Eilis for organizing this fun exchange.
The gingerbread man we sent to 12 other schools reversed to a reindeer.  So cute.

Gingerbread crafts, glyphs and poems
We decorated paper gingerbread men with white crayons.


Of course, we will decorate real cookies too.

We decorate the classroom 

Lots of Dollar Store decorations and blue ticky-tac to decorate our dollhouse for a gingerbread family!


This class LOVES imaginative play and decorating.
working on an elf home


wrapping blocks to use as pretend presents

using our dot markers to make lights

This is the elf house or reindeer's home (depending on the day:)

Sunday, December 8, 2013

Adorable Holiday Gifts for My Students

        Each year our preschool teachers make gifts that we give to all the students at our holiday program. I love the VERY simple, inexpensive light up snowman ornaments we made this year. These have been all over Pinterest but I'm not sure where they started.
        For each ornament we used a battery operated tea light (from the Dollar Store), a small piece of thick holiday scrapbook paper cut in the shape of a hat, a small pompom,  and 2 pieces of ribbon (each about 4" long).  You will also need a black permanent marker and a hot glue gun.


We tied a knot in the middle of the wider piece of ribbon (for the scarf) and made a loop with the narrow ribbon (to hang the ornament) .  We added face details with the marker (and put our school name and the date on the back of the hat) and then hot glued the ribbons and paper hat to the tea light.  When it is lit, the nose is orange! So cute!
I also made little elf ornaments for our classroom tree.  They were also very simple! After they decorated our tree, we used them as gift tags on the hand print calendars we made for our families.


I started by taking a picture of each child wearing an elf hat with their hands together above their heads (or just in a silly position if they preferred). 
I then cut the student out of the picture, laminated the picture, punched a small hole in the top and threaded a pipe cleaner with a bell on it to make a loop to hang the elf on the tree.  The kids love their silly elf ornaments (and I predict they will like them even more in future years when they look back at how cute and silly they were in pre-K).


Finally, if you'd like directions for the beautiful picture ornaments we made for the kids last year, click here.

If your looking for a really fun holiday idea for your classroom or home, check out our life-size gingerbread house.


Saturday, November 16, 2013

Lots of Leaves

The children in my preschool class love fall.  They especially love the leaves!

Here are some of the fun things we have done with leaves during the last few weeks. We wrote a list of things that you can do with Autumn Leaves.  We then made our list into a poem title "What to do with Autumn Leaves." The last line is "Sometimes you can even LEAVE them!"  The kids liked the homophone humor.  I'm not sure where I first saw it because I've been doing this for years and years.  
One of my very favorite fall projects is our melted crayon leaves.  These are truly beautiful!!  We cut leaf shapes from brown craft paper (the stuff on big rolls).    We then melt crayons (in fall colors) on sheets of foil on top of old fashioned electric warming trays (this is something you want to find at a yard sale if you don't have one).  One by one the children drop their leaves onto the melted crayon and then use a pencil to push the paper into the melted crayons.  An adult takes the leaf off of the warming tray (again with a pencil). I didn't have my camera the day the kids made the leaves this year.:(  The process is very simple and the results are truly spectacular (and last for years!)
The melted crayon leaves look especially pretty on a window because they almost have a stained glass quality.  The children also made fall trees for our window by gluing pieces of torn tissue paper to a piece of wax paper.  They then glued a trunk to the piece of wax paper.  Simple but very pretty on a window.
Another torn paper project involved making fall trees from torn pieces of construction paper. Tearing the paper is great fine motor skill work and always love the way the kids chose to place their leaves.


We also had leaves on our homemade light box.  I made the light box from a box I bought at Ikea following Kara's Classroom directions. I drew a tree on a piece of contact paper and then taped the contact paper sticky side up on the top of the light box.  I put out leaves that I had bought on sale at the Target Dollar Spot.  The kids had lots of fun sorting and making patterns on the branches.  The sticky background was definitely a big draw.  I got the idea  from Dyan here.

We also went on lots of fall walks and often collected leaves.  After reading Leaf Man, we made our own leaf creatures.  The kids used quite a bit of white glue.  I then put a sheet of wax paper between the pages and then left them under a heavy box for a week so they dried nice and flat.  

Leaf butterflies
A leaf man.
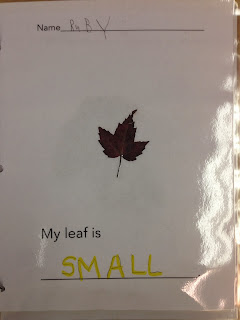
 We also picked one favorite leaf to describe for our class book about Autumn Leaves.

Since we are just beginning to work on handwriting, I wrote the word the child suggested to describe his or her leaf and then the child traced the word.
We also did leave rubbings.  The secret to great leaf rubbings with little ones is to tape the stem of fresh leaves (NOT dried at all) to the back of a piece of paper.  The back side of the leaf (with the veins) should be next to the paper.  The kids then used the side of fat crayons to make the leaf magically appear.  There were kids in my class who did dozens of leaves. 

Finally, this week we did one of my very favorite fall activities.  I found this idea on the Let's Explore blog. After reading Todd Parr's Thankful Book, I talked with each child individually about what they were thankful for.  Each child gave me a list of 6-8 things they are thankful for.  I put them into a simple poem titled Thankful and then printed the poem onto watercolor paper (I trimmed the paper to 8 1/2 x 11 so it would fit in the printer).  I then covered the poem with a piece of clear contact paper cut in the shape of a leaf.  The kids used liquid water color to paint around the leaf. When the kids finished painting (right up to the leaf), I pulled off the contact paper.  

before the contact paper is removed


These make me smile. They are beautiful both visually and because of what the children are thankful for.


Sunday, November 10, 2013

Soup From a Stone...Fancy That!

         Last week was a wonderful week - all about community and sharing and stone soup.  We began the week reading the classic version of Stone Soup written by Marcia Brown. We then acted out the story of the value of sharing and coming together as a community using a big pot and play vegetables from our classroom.  The kids LOVE any time we act out stories (and were frequently seen reenacting the story during free play:)  Throughout the rest of the week we read other versions of Stone Soup and did lots of comparing and contrasting of the different settings, characters and story lines.  


The stone soup would be even better if only we had some carrots.


We also made Stone Soup collages.  I cut out rectangles and squares.  The children cut the corners to make circles (onions), ovals (corn and potatoes), cut a diagonal line to make triangles (carrots) and in half to make rectangles (green beans).  The kids then used a marker to add details.  We added a real rock to our Stone Soup collages.  The kids also wrote the words Stone Soup on the top of their pots.  I loved this project because it involved cutting and handwriting practice as well as practice following directions.  However, despite the guided nature of this project, a lot of the kids personal touches came through on the final product.  I found these adorable collages on Mrs. Solano's Kindergarten Blog.


The final activity for our Stone Soup week was our actual stone soup.  I put a sign up sheet on line asking for the stone soup ingredients.  I supplied a special stone from our lake house.  Next year I will collect the vegetables on Thursday and parboil the vegetables.  The potatoes and carrots were hard to cut with our child safe knifes (they are like pumpkin knifes and required more sawing than cutting).

Many kids originally said they didn't want to try the soup but almost everyone did and they were very pleased with their cooking ability.
The final thing we did was write out the recipe.  It was so cute because the kids wanted me to post the recipe on our school website so their moms could make the soup at home. That print motivation is such an important early literacy skill.